Arietta G25: Unterschied zwischen den Versionen
Mose (Diskussion | Beiträge) (→Blink) |
Mose (Diskussion | Beiträge) K (→blinky.py: aufzählung korrigiert) |
||
| Zeile 184: | Zeile 184: | ||
Wie auf obiger Website beschrieb, oder manuell, wie folgt: | Wie auf obiger Website beschrieb, oder manuell, wie folgt: | ||
Wir müssen vom Arietta G25 in das Internet kommen. | # Wir müssen vom Arietta G25 in das Internet kommen. | ||
# Wir müssen root sein. | |||
Wir müssen root sein. | # root@arietta:~$ git clone git://github.com/tanzilli/ablib.git | ||
# root@arietta:~$ cd ablib | |||
root@arietta:~$ git clone git://github.com/tanzilli/ablib.git | # root@arietta:~$ python setup.py install | ||
root@arietta:~$ cd ablib | |||
root@arietta:~$ python setup.py install | |||
Falls der Arietta G25 nicht mit dem Internet verbunden ist, | Falls der Arietta G25 nicht mit dem Internet verbunden ist, | ||
Version vom 19. Oktober 2014, 20:02 Uhr
| Foto | |
|---|---|

| |
| Basisdaten | |
| Status | funktionstüchtig |
| Schöpfer | ACME Systems |
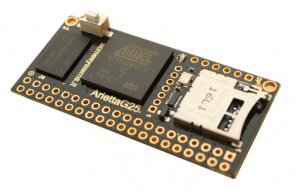
Das Arietta G25 Board ist ein SoC ARM9@400MHz. Es ist aufgrund seiner Größe (25x53mm) und Preises von 20€ bzw. 30€ interessant.
Linksammlung
- Allgemeine Produktseite
- SoC AT91SAM9G25 datasheet
- J4 PinOut & Device Tree Compiler
- Stromaufnahme
- Jürgen's LED Spielplatz
Debug Port Interface
Pinbelegung
Farbkodierung entsprechend FTDI-Standardbelegung
| 1 | 2 | 3 | 4 | 5 | 6 |
|---|---|---|---|---|---|
| Vcc 3V3 | EN5V (in) | TxD (out) | RxD (in) | WKUP (in) | GND |
Software
115200 Baud 8N1 nofc
HowTos
http://wiki.fablab-nuernberg.de/w/Ding:Arietta_G25/howto-kernel
GPIO Kernel IDs
Kernel IDs
| PINNAME | Offset | Pin-Nr | KERNELID |
|---|---|---|---|
| PA0 | 0 | 0 | 0 |
| PA1 | 1 | 1 | 1 |
| ... | |||
| PB0 | 32 | 0 | 32 |
| PB1 | 32 | 1 | 33 |
| ... | |||
| PC0 | 64 | 0 | 64 |
| PC1 | 64 | 1 | 65 |
| ... | |||
| PD0 | 96 | 0 | 96 |
| PD1 | 96 | 1 | 97 |
| ... | |||
root@arietta:~# echo <KERNELID> > /sys/class/gpio/export

root@arietta:~# ls -al /sys/class/gpio/pio<PINNAME>/
total 0
drwxr-xr-x 3 root root    0 Jan  1 02:52 .
drwxr-xr-x 4 root root    0 Jan  1 02:46 ..
-rw-r--r-- 1 root root 4096 Jan  1 02:52 active_low
lrwxrwxrwx 1 root root    0 Jan  1 02:52 device -> ../../../fffff400.gpio
-rw-r--r-- 1 root root 4096 Jan  1 02:52 direction
-rw-r--r-- 1 root root 4096 Jan  1 02:52 edge
drwxr-xr-x 2 root root    0 Jan  1 02:52 power
lrwxrwxrwx 1 root root    0 Jan  1 02:46 subsystem -> ../../../../../../../class/gpio
-rw-r--r-- 1 root root 4096 Jan  1 02:46 uevent
-rw-r--r-- 1 root root 4096 Jan  1 02:52 value

root@arietta:/sys/class/gpio# echo <KERNELID> > unexport

root@arietta:/sys/class/gpio# ls -al /sys/class/gpio/pio<PINNAME>/
ls: cannot access pio<PINNAME>/: No such file or directory
WiFi
root@arietta:~# lsusb
Bus 001 Device 002: ID 148f:5370 Ralink Technology, Corp. RT5370 Wireless Adapter
Bus 001 Device 001: ID 1d6b:0002 Linux Foundation 2.0 root hub
Bus 002 Device 001: ID 1d6b:0001 Linux Foundation 1.1 root hub

root@arietta:~# iwconfig
lo        no wireless extensions.
usb0      no wireless extensions.
sit0      no wireless extensions.
wlan0     IEEE 802.11bgn  ESSID:off/any
          Mode:Managed  Access Point: Not-Associated   Tx-Power=0 dBm
          Retry short limit:7   RTS thr:off   Fragment thr:off
          Encryption key:off
          Power Management:off

root@arietta:~# vi /etc/network/interfaces
auto lo
iface lo inet loopback
  pre-up modprobe g_ether
  auto usb0
  iface usb0 inet static
  address 192.168.10.10
  netmask 255.255.255.0
  #gateway 192.168.10.20

auto wlan0
iface wlan0 inet dhcp
  wpa-conf /etc/wpa_supplicant/wpa_supplicant.conf
~
~
~

root@arietta:~# vi /etc/wpa_supplicant/wpa_supplicant.conf
network={
  ssid="YOURSSID"
  psk="YOURPSK"
  proto=RSN
  key_mgmt=WPA-PSK
  pairwise=CCMP
  auth_alg=OPEN
}
~
~
~
blinky.py
Voraussetzung: Der Arietta G25 muss bootfähig und über ein Terminal erreichbar sein.
Die blinkende LED wollen wir an Port PA23 anschließen. Vorwiederstand nicht vergessen, ca. 1 kOhm.
Anschlusschema:
J4 40 polige Pinleiste
 Pin 3 -----+
 PA23       |
            |
           +-+
           | |  R
           | |  1 kOhm
           +-+
            |
            |
           ---
           \ /   LED
          -----
            |
            |
 Pin 9 -----+
 Gnd
Wir wollen den Blinker mit Python machen. Hierfür benötigen wir die ablib.py welcher bei dem aktuellen Image (Stand: Okt 2014) leider veraltet und daher nicht verwendbar ist.
Aktuelle ablib installieren, siehe folgenden Link: http://www.kiwil-dev.fr/2014/06/arietta-g25-blink.html
Wie auf obiger Website beschrieb, oder manuell, wie folgt:
- Wir müssen vom Arietta G25 in das Internet kommen.
- Wir müssen root sein.
- root@arietta:~$ git clone git://github.com/tanzilli/ablib.git
- root@arietta:~$ cd ablib
- root@arietta:~$ python setup.py install
Falls der Arietta G25 nicht mit dem Internet verbunden ist, müssen die notwendigen Dateien anders in das Filessystem kopiert werden.
z.B. die micro SD-Card in einen Linux rechner mounten und nach /home/user/ablib kopieren. Danach SD-Card umounten, in den arietta einsetzen und diesen booten.
Nun einloggen und als root folgendes ausführen: root@arietta:~$ python setup.py install
Nun wird ein einfaches Script geschrieben:
Filname: blinky.py
 #!/usr/bin/python
 #
 # Quelle: http://www.kiwil-dev.fr/2014/06/arietta-g25-blink.html
 #

 from ablib import Pin
 from time import sleep

 print "Blinking led"
 print "Type ctrl-C to exit"

 led = Pin('J4.7','OUTPUT')

 while True:
   sleep(0.5)
   led.on()
   sleep(0.5)
   led.off()
Nun das Script ausführbar machen:
root@arietta:~$ chmod u+x blinky.py
Und nun das Script ausführen, geht nur als root:
root@arietta:~$ ./blinky.py
Das war's